Git VCS – Overview
This section explains the basic concepts of Git and its usage.
Introduction
GIT vs. SVN
Git has more advantages than traditional VCS (e.g. SVN, CVS).
Terminology
Below are some important terms used in the context of Git. The first three terms also make up the three stages of the Git Lifecycle.
This is the current state of the project.
This is the temporary location of the changes done in the project in working directory.
The local repository is the location on our computer where the original cloned project resides. The project in the repository is updated when the changes in the staging area are committed.
A commit refers to adding or overwriting files in the project. Every commit has a unique commit id (git hash), author name, commit message and timestamp.
A branch, that is checkout from a version of the project at any instant, is an isolated part of the project. It allows parallel and independent development on a version of the project.
A clone is a local working copy of a remote repository.
This is the default branch created when we initialize a repository. It is supposed to contain the latest stable version of the project.
The HEAD points to the latest commit of our current branch.
This refers to merging of the code in from one branch into another. When merging changes from a different branch we may have conflicts that are either automatically merged or have to be manually merged.
Setup
We can install Git on our computer from the official website. Further, we can use Git Bash terminal to execute pre-defined commands for working with Git. These commands start with the keyword ‘git’.
Basic Operations
In this section, we will see the basic operations that can be performed with git.
1. Create a Repository
There are two ways in which we can create a repository.
We create a folder on our local drive, navigate to the folder and initialize it as a git repo:
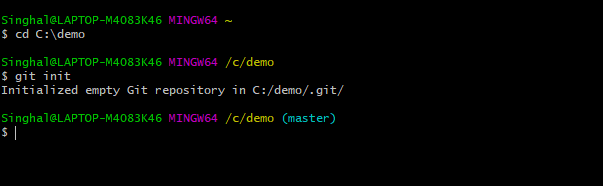
Command: git init
Now, we can connect it with the server (Git provider e.g. Github). We add it as a remote repo by using a URL provided by the git provider, and refer to it as ‘origin’:
![]()
Command: git remote add <remote-name> <remote-url>
The other option is to first create a remote repository on a Git provider and then clone it to our local machine using the URL provided by the provider:
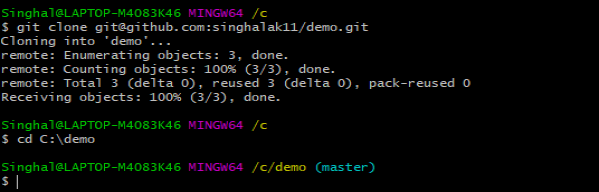
Command: git clone <remote-url>
2. Add Changes to Working Directory
Now we are inside our working directory on the ‘master’ branch, and we can add changes (new files or folders) to the project. We add a file README.md with some text:

3. Check Current State of Working Directory
We can check the status of the working directory i.e. changes that we have done in the project: 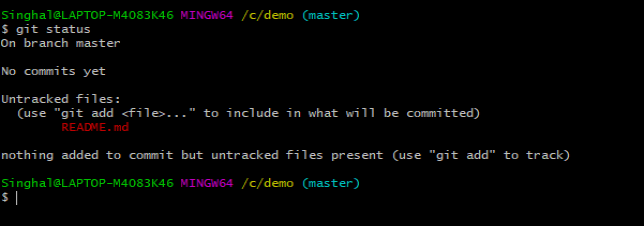
Command: git status
4. Add Changes to Staging Area
Once we have verified the status, we can add the changes that we want to commit to the staging area: 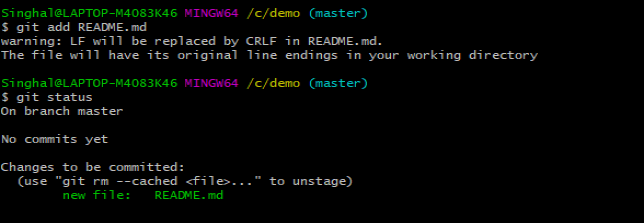
Command: git add <filename>, or git add . (to add all files)
5. Commit to Local Repository
Now we can commit all the changes in the staging area to our local repo:

Command: git commit –m <commit message>
6. Push Changes to Remote Repository
Next, we upload or push the changes to upstream i.e. the remote repo:

Command: git push <remote-name> <remote-branch>
7. Create new Branch
Generally, we do not modify the master branch, and rather we create a new branch for specific requirements:

Command: git checkout –b <new-branch-name>
8. Push New Branch to Remote Repository
We add a new file ‘HelloWorld.java” in the ‘newfeature’ branch and then we commit the changes and push the branch to the remote repo:


Command: git push –set-upstream origin <branch-name>
9. Merge changes
Next, we move to the ‘master’ branch and then merge the changes from the ‘newfeature’ branch:
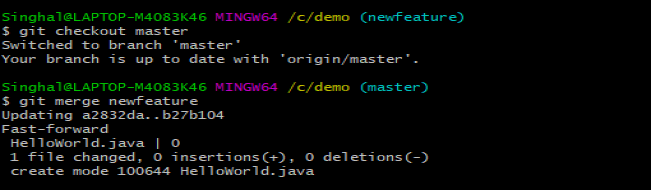
Command: git merge <source-branch>
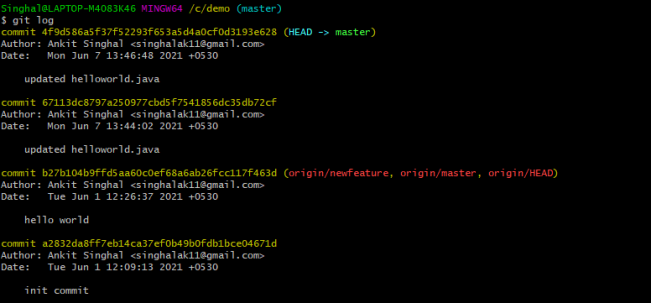
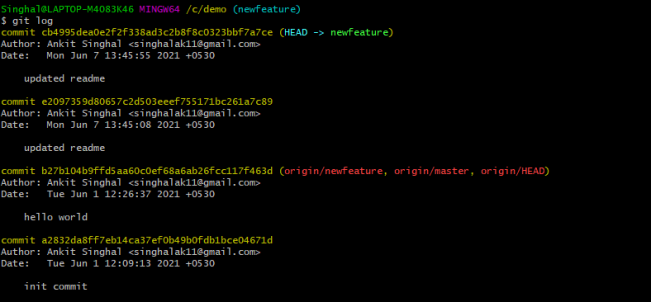
10. Commit History
We can also audit the commits in the project:
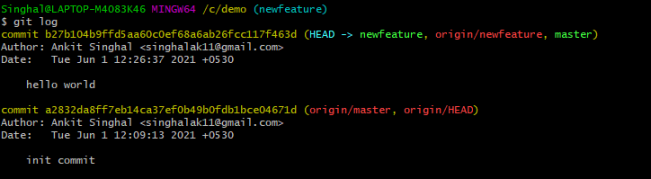
Command: git log
11. Pull Changes from Remote Repository
While working in the local repo, we can update the code from the remote:

Command: git pull <remote-name> <remote-branch>
When the remote and the local repo contain changes in the same file, it could lead to conflicts in the pull request. These conflicts are resolved automatically by Git if possible, otherwise we have to resolve manually and commit the changes to complete the pull request.
Suppose the remote and the local repo contains changes in README.md:
Remote:

Local:

When we pull, a conflict is reported which needs to be resolved manually:

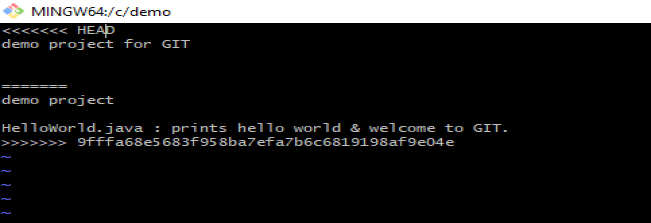
We update the file to the state that we want to keep and then commit the changes:


12. Fetch Information from Remote Repository
We can fetch the repository metadata (information related to commits, branches, etc.) from remote to the local repo without actually copying the updates using the fetch command.
Suppose we add/merge some changes in the master branch in the remote repo, we can fetch the details of these updates to the local repo:
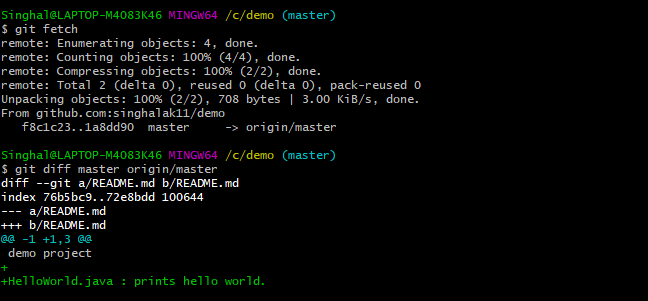
Command: git fetch<remote-name> <remote-branch>
13. Rebase
While the merge command preserves the commit history and creates a new merge commit in the source branch, rebase only adds changes done in the source branch on the top of the target branch.
Suppose we have 2 new commits each in the master and newfeature branches:
When we do rebase on the newfeature branch, the commits from master branch are added:


Command: git rebase <target-branch>
14. Help
We can get more information about usage of git and the commands using the help command.
Command: git help
Leave a Reply